Showing posts with label Basic Tools. Show all posts

Sunday, January 8, 2012

Faking Depth of Field

Today I’m going to show you how to create a fake depth of field in a photograph. 

In optics, particularly as it relates to film and photography, depth of field (DOF) is the distance between the nearest and farthest objects in a scene that appear acceptably sharp in an image. Although a lens can precisely focus at only one distance at a time, the decrease in sharpness is gradual on each side of the focused distance, so that within the DOF, the unsharpness is imperceptible under normal viewing conditions.

Sometimes, it is not possible to capture images with an appropriate Depth of field. This is where photoshop comes in handy and can produce quick results in no time.

Open up your image in Photoshop and select the background layer in the layers panel 
Next, click on this icon to enable the quick mask mode (or press Q). 


To create an apparent depth of field, I’m going to keep the portion at the bottom visible and in focus, and create a blur as you move away to the top. So the flowers on the top seem further away and out of focus. With your foreground colour as black and background colour as white, select the Gradient tool (G).

Now, click where you want your blur to begin, drag your cursor and release part way to the top as shown.


You can use the eraser (E) and brush (B) tool in case you want to modify the mask. Remember, the part in red will stay clear and the rest will be blurred gradually. 


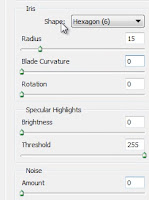
 Once you're happy with the mask, disable the quick mask mode by clicking on the icon again or by simply pressing Q To add your blur, go to Filter > Blur > Lens Blur. Set a radius of about 15 and curvature to 0 and click Okay.
You can deselect by pressing Ctrl + D. And there you have it! A fake depth of field that can make any picture look epic  

Feel free to comment or post any queries or images.
If you like this tutorial, do subscribe and you should check out some of our other ones.


Monday, May 2, 2011

The Pen Tool

   There are tons of people in this world who use a lot Photoshop and yet, somehow or the other, never come around to learning how to use the Pen Tool, either thinking that it's too hard or that it's rather unnecessary. They end up using the Lasso tool to make complicated selections. And the end result? A frustrated person with a mediocre selection and a load of time wasted. So if you don't know how to use the  Pen tool yet, I suggest you read on.

  The pen tool is one of the most versatile tools in Photoshop to make selections with. Why is it better than the Lasso tool? Well for starters, its a lot easier to correct and modify selections with it and it's a lot more stable. It takes a bit of time to become totally comfortable with it, but once you've done that, you'd probably think its the easiest thing ever. The Pen tool can be found in the tool bar (the icon with a fountain pen nib in it) or can be chosen by pressing P. 

Before starting, make sure you've selected the path mode in the properties bar on the top

  The Pen tool is used to create paths. A path is a boundary or line that consists of two or more anchor points. Imagine a garden walkway consisting of tiny tiles. The 'path' is analogous to the walkway and the 'anchor points' are analogous to the tiles. Once you've selected the pen tool, every time you click on your canvas, you get an anchor point. The current anchor point is linked to the previous one and a path is formed. A path may consist of as many anchor points as you wish with a minimum of at least two. The more there are, the more accurate you're selection gets. Once your path is created, you can convert it to a selection as we will discuss later.


WORKING WITH ANCHOR POINTS

  To make a closed path, simply click back where you started. A small circle appearing next to the nib indicates that a closed path will be formed. You can add, remove or modify anchor points. Press and hold Ctrl and click on your path to select it.  Now,
to Add an Anchor point, move the cursor to the required point (you will see a nib with a '+') and click . 
to Delete an Anchor point, move the cursor to it (you will see a nib with a '-') and click.
to Move an Anchor point, hold down Ctrl, click on the point and pull.


DIRECTION HANDLES


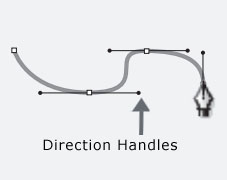
 But really, what IS special about the Pen tool? Now that we know a bit about it, we can really start learning how to exploit it. To do this, all we have to do, is to learn what direction handles are and how to use them. Direction handles are basically to control the direction, curvature and length of path between anchor points. Instead of simply clicking to get an anchor point, if you click, hold and drag, you will notice that a line with two diamonds at each of its ends will appear. These diamonds are direction handles. By moving direction handles, you alter the path curvature between two anchor points.


This way you get more flexibility to select objects with curves as well as straight lines. Once you've finished you're path, 
to Add a handle to a point that had none, hold down the Alt key, click on the point and pull. 
to Remove a handle from a point, by hold down the Alt key and click on the point
to Move and rotate a handle,  hold down the Ctrl key, click on the handle and pull.
to Move and rotate individual handles, hold down the Alt key, click on the handle and pull.
Note: The Alt key converts the pen tool to the Convert Point tool and the Ctrl key converts it to the Direct Selection tool.


So while creating your path, you can use all of this to get near-to-perfect selection. It might look a little complicated at first, but with a little practice you can easily master it.
.

MAKING A SELECTION
  Once you've created your path you can save you're path and use it when you want, just like how you work with layers. To view the paths window, go to Window > Paths. You will see the path you just created as a path called Work Path. To save it, simply rename it anything you like (other than work path) by double clicking it. Once you're path is saved click on the dotted circle at the bottom of the window to convert it to a selection. Or just press Ctrl + Enter


  And there you have you're selection! Simple enough I suppose.

Feel free to comment or post any queries or images.


Monday, April 11, 2011

Layer Blending Modes


It is often thought that there is a LOT to learn in Photoshop before one can become a good photo editor. But  the truth is, there are only a handful of things you need to know before you can accomplish almost anything. Layer Blend modes comprise one such thing. It is essential to know when and how to use them. Here is a black and white image whose colouring is done using Layer Blend modes. A Layer Blend mode basically determines how a layer interacts with layers below it.

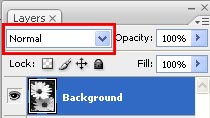
The option to choose your Layer Blend mode is found at the top of the Layer window (F7).The default mode is 'Normal'. There are several types of such blend modes. They can be broadly classified as shown below.


Now, we will discuss 4 important layer modes

1. Multiply ( Alt + Shift + M)
It is a Darken blending mode. Imagine a light beam passing through two identical slides and then landing in a wall to form an image. The image thus formed, will be darker than the image that would be formed with only one slide. This is essentially what the Multiply Blending mode does. Here is an example of what this blending mode can do.

Duplicate the image twice by hitting Ctrl + J +J and then change the Blending Mode of the new layers to Multiply. Go to the top most layer. Next go to Filter > Blur > Gaussian Blur and enter a radius of  5. You should get something like this. 


2. Screen ( Alt + Shift + S)
The Screen mode brightens the image by lightning the lower layer based on the lightness of the upper layer. The result is always lighter, and makes it a good mode for correcting exposure in photos that are too dark. Here is an example. Consider this image.


Duplicate the image layer by pressing Ctrl + J  and chagne the blending mode of the  new layer to Screen. You can adjust the brightness of the screening layer if required.


3. Overlay ( Alt + Shift + O )
The Overlay Blending mode is used to improve the contrast of an image elegantly. The mode preserves the highlights and shadows of the base color while mixing the base color and the blend color (top layer). It is a combination of the Multiply and Screen blending modes: multiplying the dark areas, and screening the light ones. Here is an example. Consider this image.


Duplicate the image twice by hitting Ctrl + J +J and then change the Blending Mode of the new layers to Overlay. You should get something like this.


4. Color ( Alt + Shift + C )
When the Color mode is applied, only the colour  from the top layer is blended in with the layers below it. The Shadows and highlights of the original image are retained. Similar principles are used to colour old black and white movies. The Color blend mode is perfect for when you want to add or change the colors in an image without changing the brightness values. Here is an example with a desaturated sunflower image.

Create a new layer on top of your image and set it Blending mode to Color. Choose a suitable colour and paint over the petals (with the new layer selected) with the Paint Brush tool.


Duplicate the new layer by hitting Ctrl + J.


You will get something like this.


Feel free to comment or post any queries or images.
If you like this tutorial, you should check out some of our other ones
                  

Sunday, April 3, 2011

The Lasso Tool

The Lasso tool  (L) is used for making selections of objects, especially those with straight or high contrast edges. It is one of the most useful tools that Photoshop offers. It comes in three varieties - the Freehand Lasso Tool (or simply the 'Lasso Tool'),  the Polygonal Lasso Tool and the Magnetic Lasso Tool. Here we discuss all three types. To choose the Lasso Tool, click on it in the tool bar as shown below. Then click on the type you want. Alternatively, you may simply press L to select it and press Shift + L to change the type.


The Freehand Lasso Tool (Lasso Tool):
The tool is shaped like the lasso of a cowboy. This is probably the easiest to understand because you simply drag a freehand selection around the object or area you want to select. After choosing the tool, simply click on the edge of the object you want to select and outline it with the left mouse button held down. If you want to scroll, hold down the Space bar and Photoshop temporarily switches to the hand tool. To zoom, press Ctrl + at any time.  You can complete the selection by letting go of the mouse at the point where you started. In case you let go at a prior point, then Photoshop will automatically complete the selection by joining the end and start points by a straight line. Here I've started selecting part of a turtle. As you can see, the selection is nowhere near perfection. But don't worry, we'll discuss how to correct a selection a little later, below.


The Polygonal Lasso Tool:
This is the lasso tool shaped like a polygon. It can be used to make selections in the form of a polygon like a house or a building. For more complex objects like this turtle, you can make your selection by creating a polygon whose sides are very small. That way, you will get a continuous curve.
Here is how you use it. After choosing the tool, click on the point where you want to begin your selection. I have started at the top of the turtle's tail. Zoom in (Ctrl +) and click on the next point on the object such that the first point and this are almost a straight line. Like this, outline the entire object. In case you want to switch over to the Freehand Lasso Tool in the middle, you can temporarily do so be holding down the alt key. Scrolling can be accomplished by holding down the Space bar. You can complete the selection by clicking on the point you started at. If you double click, Photoshop will automatically close the selection by joining the start and endpoints with a straight line.


The Magnetic Lasso Tool:
This is the third type of lasso tool and one of the most exiting features of Photoshop! With just a couple of clicks and a lazy drag, you can produce a selection of high accuracy (70-90% depending on the figure). Here's how. First choose the Magnetic Lasso Tool from the tool bar. The icon is similar to the polygonal lasso tool but has a tiny magnet on its head. Once you've done this, to begin selection, zoom in (Ctrl + ) and click on the edge of the object you wish to select. Release the mouse button. Now, slowly move the tool along the edge of the object. You will notice that the tool will add anchor points on the edge as you move the mouse along. 
What the tool does, is that it checks the contrast levels between areas near the mouse and adds an anchor point wherever it feels there is a sufficient difference in contrast. It basically finds the object's edge. You can change the minimum contrast difference in the bar (which appears on top) as shown below. Also the area in which the tool looks for an edge can be set by changing the width or by pressing '[' or ']'. To view the ara of consideration, press Caps lock. The frequency controls the rate at which anchor points are added. 57 is the standard value and it works well.


So as you move the mouse, more anchor points are added. You can add them manually as well by clicking wherever desired. Also, you can remove previous anchor points by simply pressing the Backspace button. To complete the selection, click back on the starting point.


Selection correction:
This is absolutely necessary to improve the accuracy of your selection.


Once you've made your selection using one of the lasso tools, zoom in and examine the around the edges of the object. Select one of the lasso tools, whichever suits you and the situation, and scroll to the place where there is a discrepancy. 


In case the selection goes outside the object like above, then hold down the Alt key. You will notice that a '-' appears next to the tool icon. Select the part of the selection to be removed as shown, without letting go of the Alt key.


Once the you've done that, the original selection will be modified as per your new selection.


Similarly, to increase the area of selection, hold down the Shift key and select a new region to be added to the current selection.


Once you've done this to the whole object, you will get a perfect selection.


To copy the selection, choose the layer of the image from the layer window (F7) and press Ctrl + C. Paste it wherever you want by pressing Ctrl + V.

The turtle, with no background!
And it's as simple as that!