There are tons of people in this world who use a lot Photoshop and yet, somehow or the other, never come around to learning how to use the Pen Tool, either thinking that it's too hard or that it's rather unnecessary. They end up using the Lasso tool to make complicated selections. And the end result? A frustrated person with a mediocre selection and a load of time wasted. So if you don't know how to use the Pen tool yet, I suggest you read on.

The pen tool is one of the most versatile tools in Photoshop to make selections with. Why is it better than the Lasso tool? Well for starters, its a lot easier to correct and modify selections with it and it's a lot more stable. It takes a bit of time to become totally comfortable with it, but once you've done that, you'd probably think its the easiest thing ever. The Pen tool can be found in the tool bar (the icon with a fountain pen nib in it) or can be chosen by pressing P.
Before starting, make sure you've selected the path mode in the properties bar on the top

The Pen tool is used to create paths. A path is a boundary or line that consists of two or more anchor points. Imagine a garden walkway consisting of tiny tiles. The 'path' is analogous to the walkway and the 'anchor points' are analogous to the tiles. Once you've selected the pen tool, every time you click on your canvas, you get an anchor point. The current anchor point is linked to the previous one and a path is formed. A path may consist of as many anchor points as you wish with a minimum of at least two. The more there are, the more accurate you're selection gets. Once your path is created, you can convert it to a selection as we will discuss later.

WORKING WITH ANCHOR POINTS
To make a closed path, simply click back where you started. A small circle appearing next to the nib indicates that a closed path will be formed. You can add, remove or modify anchor points. Press and hold Ctrl and click on your path to select it. Now,
to Add an Anchor point, move the cursor to the required point (you will see a nib with a '+') and click .
to Delete an Anchor point, move the cursor to it (you will see a nib with a '-') and click.
to Move an Anchor point, hold down Ctrl, click on the point and pull.

DIRECTION HANDLES
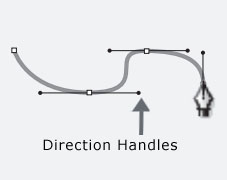
But really, what IS special about the Pen tool? Now that we know a bit about it, we can really start learning how to exploit it. To do this, all we have to do, is to learn what direction handles are and how to use them. Direction handles are basically to control the direction, curvature and length of path between anchor points. Instead of simply clicking to get an anchor point, if you click, hold and drag, you will notice that a line with two diamonds at each of its ends will appear. These diamonds are direction handles. By moving direction handles, you alter the path curvature between two anchor points.
This way you get more flexibility to select objects with curves as well as straight lines. Once you've finished you're path,
to Add a handle to a point that had none, hold down the Alt key, click on the point and pull.
to Remove a handle from a point, by hold down the Alt key and click on the point
to Move and rotate a handle, hold down the Ctrl key, click on the handle and pull.
to Move and rotate individual handles, hold down the Alt key, click on the handle and pull.
Note: The Alt key converts the pen tool to the Convert Point tool and the Ctrl key converts it to the Direct Selection tool.

So while creating your path, you can use all of this to get near-to-perfect selection. It might look a little complicated at first, but with a little practice you can easily master it.
.
MAKING A SELECTION
Once you've created your path you can save you're path and use it when you want, just like how you work with layers. To view the paths window, go to Window > Paths. You will see the path you just created as a path called Work Path. To save it, simply rename it anything you like (other than work path) by double clicking it. Once you're path is saved click on the dotted circle at the bottom of the window to convert it to a selection. Or just press Ctrl + Enter.

And there you have you're selection! Simple enough I suppose.

Feel free to comment or post any queries or images.
No comments:
Post a Comment