Sunday, January 8, 2012

Faking Depth of Field

Today I’m going to show you how to create a fake depth of field in a photograph. 

In optics, particularly as it relates to film and photography, depth of field (DOF) is the distance between the nearest and farthest objects in a scene that appear acceptably sharp in an image. Although a lens can precisely focus at only one distance at a time, the decrease in sharpness is gradual on each side of the focused distance, so that within the DOF, the unsharpness is imperceptible under normal viewing conditions.

Sometimes, it is not possible to capture images with an appropriate Depth of field. This is where photoshop comes in handy and can produce quick results in no time.

Open up your image in Photoshop and select the background layer in the layers panel 
Next, click on this icon to enable the quick mask mode (or press Q). 


To create an apparent depth of field, I’m going to keep the portion at the bottom visible and in focus, and create a blur as you move away to the top. So the flowers on the top seem further away and out of focus. With your foreground colour as black and background colour as white, select the Gradient tool (G).

Now, click where you want your blur to begin, drag your cursor and release part way to the top as shown.


You can use the eraser (E) and brush (B) tool in case you want to modify the mask. Remember, the part in red will stay clear and the rest will be blurred gradually. 


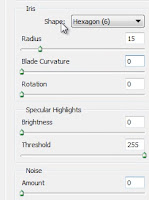
 Once you're happy with the mask, disable the quick mask mode by clicking on the icon again or by simply pressing Q To add your blur, go to Filter > Blur > Lens Blur. Set a radius of about 15 and curvature to 0 and click Okay.
You can deselect by pressing Ctrl + D. And there you have it! A fake depth of field that can make any picture look epic  

Feel free to comment or post any queries or images.
If you like this tutorial, do subscribe and you should check out some of our other ones.


Tuesday, May 10, 2011

Energy Beams and Lines in Photoshop

1  |  2  
Energy Blast! Ever wondered how Graphic designers created light streaks on their images? Or how similar cool effects were made in cartoons and movies? If the answer to this question is no, then shame on you! Anyways, here I show you how to achieve exactly that. If you don't know how, read on - it's simple.


What we want is a an image which looks like its got energy oozing out from its parts to make it look more vibrant. To start off, lets make a soft glow. Open a new file with a black background. Choose the Brush tool (B) and with a soft brush of radius of 200 to 300, make a white spot in a new layer as shown below.


Duplicate the layer (Ctrl + J) several times- until you're happy with the result, and set the Blend mode of all the duplicate layers to Overly (Shift + Alt + O)


Create a new layer on top of this and fill it with yellow using the Paint Bucket tool (G). Change the Blend Mode to Color.


Merge all your layers (Shift + Ctlr + E). Now, open up you're base image. This was the image I started with.


Get out the Pen Tool (P). Now, make a path around the player and the hoop and select it. If you don't know how to use the pen tool, you can read our tutorial.


Move the selected region onto the first file. Feel free to position the player and the hoop in any way you think appropriate. If you're in doubt, you can do something along these lines. 


To give it a muscular look, duplicate the player layer. With the duplicate layer selected, go to Filter > Artistic > Plastic Wrap. Use these parameters.


Set the Blend mode of the layer to Overlay. You will get something like this.


Now, to add a little agility to the image, duplicate the base player layer and go to Filter > Blur > Motion blur. Enter these parameters.


Move the layer a little to the left.


Temporarily hide the visibility of the blurred layer by pressing the little eye next to it in the layers panel (F7). Now that we have the base image ready, lets see how to make those cool energy lights and beams in the next page.
1  |  2
                  

Energy Beams and Lines in Photoshop II

1  |  2 
Now, we will make energy beams at his hands. Choose the Pen Tool (P) and create a path near the hand. What we want to do is make a beam that is in line with the direction of movement of the hand.


Now, convert the path to a selection (Ctrl + Enter). Feather the selection (Alt + Ctrl + D) with a radius of 10 px. Create a new layer under the player layer and fill the selection with white using the Paint Bucket tool (G). 


With the selection still active, create a new layer above this white layer and fill it with blue.Set its blend mode to Overlay. Deselect by pressing (Ctrl + D). Now, duplicate (Ctr + J) both the white  and blue layers and set their blend modes to Overlay. You will get something like this. 


Make a similar path and selection for the other hand. 


Now that all our energy beams are in place, we can begin with the energy lines. We will make them at each of the hands and legs. Lets begin with the right hand. First, we make our basic path as shown with the Pen tool (P)


Next, create a new layer above the player layer. Go to the brush tool and choose a brush of radius 5  -7 px. Set you're foreground colour to white. Now select the pen tool and right click on the path. Choose 'Stroke Path' and select Simulate Pressure 


You will get something like this.


To remove the parts that are to be behind the arm, simply erase the unwanted portion using the eraser.


Next, right click this layer in the layers palette (F7) and choose 'Blending Options'. Select Outer Glow. Enter the following parameters. I've chosen a red tinge for the glow.


You will end up with something like this.


Duplicate the layer (Ctrl +J) and slightly offset it. Reduce its opacity to 60 %. The create a new layer. Choose a soft brush of radius 200 px and opacity 70% and paint over the arm.


Change the blend mode to Multiply.


Repeating the same process on th other limbs and the hoop, i got this. Nice isn't it?


Remember the motion blur layer we had hidden earlier? Well make it visible it now. And there you have it!


1  |  2

Feel free to comment or post any queries or images.
If you like this tutorial, you should check out some of our other ones.


Monday, May 2, 2011

The Pen Tool

   There are tons of people in this world who use a lot Photoshop and yet, somehow or the other, never come around to learning how to use the Pen Tool, either thinking that it's too hard or that it's rather unnecessary. They end up using the Lasso tool to make complicated selections. And the end result? A frustrated person with a mediocre selection and a load of time wasted. So if you don't know how to use the  Pen tool yet, I suggest you read on.

  The pen tool is one of the most versatile tools in Photoshop to make selections with. Why is it better than the Lasso tool? Well for starters, its a lot easier to correct and modify selections with it and it's a lot more stable. It takes a bit of time to become totally comfortable with it, but once you've done that, you'd probably think its the easiest thing ever. The Pen tool can be found in the tool bar (the icon with a fountain pen nib in it) or can be chosen by pressing P. 

Before starting, make sure you've selected the path mode in the properties bar on the top

  The Pen tool is used to create paths. A path is a boundary or line that consists of two or more anchor points. Imagine a garden walkway consisting of tiny tiles. The 'path' is analogous to the walkway and the 'anchor points' are analogous to the tiles. Once you've selected the pen tool, every time you click on your canvas, you get an anchor point. The current anchor point is linked to the previous one and a path is formed. A path may consist of as many anchor points as you wish with a minimum of at least two. The more there are, the more accurate you're selection gets. Once your path is created, you can convert it to a selection as we will discuss later.


WORKING WITH ANCHOR POINTS

  To make a closed path, simply click back where you started. A small circle appearing next to the nib indicates that a closed path will be formed. You can add, remove or modify anchor points. Press and hold Ctrl and click on your path to select it.  Now,
to Add an Anchor point, move the cursor to the required point (you will see a nib with a '+') and click . 
to Delete an Anchor point, move the cursor to it (you will see a nib with a '-') and click.
to Move an Anchor point, hold down Ctrl, click on the point and pull.


DIRECTION HANDLES


 But really, what IS special about the Pen tool? Now that we know a bit about it, we can really start learning how to exploit it. To do this, all we have to do, is to learn what direction handles are and how to use them. Direction handles are basically to control the direction, curvature and length of path between anchor points. Instead of simply clicking to get an anchor point, if you click, hold and drag, you will notice that a line with two diamonds at each of its ends will appear. These diamonds are direction handles. By moving direction handles, you alter the path curvature between two anchor points.


This way you get more flexibility to select objects with curves as well as straight lines. Once you've finished you're path, 
to Add a handle to a point that had none, hold down the Alt key, click on the point and pull. 
to Remove a handle from a point, by hold down the Alt key and click on the point
to Move and rotate a handle,  hold down the Ctrl key, click on the handle and pull.
to Move and rotate individual handles, hold down the Alt key, click on the handle and pull.
Note: The Alt key converts the pen tool to the Convert Point tool and the Ctrl key converts it to the Direct Selection tool.


So while creating your path, you can use all of this to get near-to-perfect selection. It might look a little complicated at first, but with a little practice you can easily master it.
.

MAKING A SELECTION
  Once you've created your path you can save you're path and use it when you want, just like how you work with layers. To view the paths window, go to Window > Paths. You will see the path you just created as a path called Work Path. To save it, simply rename it anything you like (other than work path) by double clicking it. Once you're path is saved click on the dotted circle at the bottom of the window to convert it to a selection. Or just press Ctrl + Enter


  And there you have you're selection! Simple enough I suppose.

Feel free to comment or post any queries or images.


Wednesday, April 20, 2011

Turning a Picture into a Colour Pencil Drawing

Photoshop offers a vast variety of wonderful tools. Having as many as possible in your repertoire always helps. Today we make use of the Minimum filter and a few Layer Blend Modes to effectuate an absolutely pulchritudinous result. Here is the final image - a symphony of light and colourful strokes.


So let's begin. Open up you're file in Photoshop. Here is a peek into the image I used.


Now, we will duplicate and desaturate the image layer. To do this, select the image layer from the layer window (F7) and press Ctrl + J. Then press Ctrl + Shift + U to desaturate. Your image will then look something like this.


Next, we need to invert the colours of the image. Before that, duplicate the desaturated layer by pressing Ctrl + J. Then press Ctrl + I. You will get a negative like this.

Here comes the important part. With the 'negative' layer selected, go to Filter > Other > Minimum. Enter the radius as 1 pixel.


Change the Layer Blend Mode of the layer to Color dodge or press Alt + Shift + D. You will get a soft image like this.


To darken the image, first merge all layers into a new layer by pressing Shift + Alt + Ctrl + E, then change the blend mode of the new layer to Multiply. If necessary, duplicate this layer as many times as you want to get the appropriate darkness level.


To colour the image, move the original image you started with to the top of the stack and change its blend mode to Color. Beautiful, isn't it?


I've followed the same steps on other images to get wonderful results. Try it out yourself.


Feel free to comment or post any queries or images.
If you like this tutorial, you should check out some of our other ones.