Showing posts with label Photo Effects. Show all posts

Sunday, January 8, 2012

Faking Depth of Field

Today I’m going to show you how to create a fake depth of field in a photograph. 

In optics, particularly as it relates to film and photography, depth of field (DOF) is the distance between the nearest and farthest objects in a scene that appear acceptably sharp in an image. Although a lens can precisely focus at only one distance at a time, the decrease in sharpness is gradual on each side of the focused distance, so that within the DOF, the unsharpness is imperceptible under normal viewing conditions.

Sometimes, it is not possible to capture images with an appropriate Depth of field. This is where photoshop comes in handy and can produce quick results in no time.

Open up your image in Photoshop and select the background layer in the layers panel 
Next, click on this icon to enable the quick mask mode (or press Q). 


To create an apparent depth of field, I’m going to keep the portion at the bottom visible and in focus, and create a blur as you move away to the top. So the flowers on the top seem further away and out of focus. With your foreground colour as black and background colour as white, select the Gradient tool (G).

Now, click where you want your blur to begin, drag your cursor and release part way to the top as shown.


You can use the eraser (E) and brush (B) tool in case you want to modify the mask. Remember, the part in red will stay clear and the rest will be blurred gradually. 


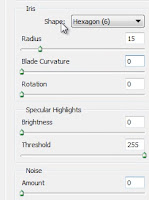
 Once you're happy with the mask, disable the quick mask mode by clicking on the icon again or by simply pressing Q To add your blur, go to Filter > Blur > Lens Blur. Set a radius of about 15 and curvature to 0 and click Okay.
You can deselect by pressing Ctrl + D. And there you have it! A fake depth of field that can make any picture look epic  

Feel free to comment or post any queries or images.
If you like this tutorial, do subscribe and you should check out some of our other ones.


Tuesday, May 10, 2011

Energy Beams and Lines in Photoshop

1  |  2  
Energy Blast! Ever wondered how Graphic designers created light streaks on their images? Or how similar cool effects were made in cartoons and movies? If the answer to this question is no, then shame on you! Anyways, here I show you how to achieve exactly that. If you don't know how, read on - it's simple.


What we want is a an image which looks like its got energy oozing out from its parts to make it look more vibrant. To start off, lets make a soft glow. Open a new file with a black background. Choose the Brush tool (B) and with a soft brush of radius of 200 to 300, make a white spot in a new layer as shown below.


Duplicate the layer (Ctrl + J) several times- until you're happy with the result, and set the Blend mode of all the duplicate layers to Overly (Shift + Alt + O)


Create a new layer on top of this and fill it with yellow using the Paint Bucket tool (G). Change the Blend Mode to Color.


Merge all your layers (Shift + Ctlr + E). Now, open up you're base image. This was the image I started with.


Get out the Pen Tool (P). Now, make a path around the player and the hoop and select it. If you don't know how to use the pen tool, you can read our tutorial.


Move the selected region onto the first file. Feel free to position the player and the hoop in any way you think appropriate. If you're in doubt, you can do something along these lines. 


To give it a muscular look, duplicate the player layer. With the duplicate layer selected, go to Filter > Artistic > Plastic Wrap. Use these parameters.


Set the Blend mode of the layer to Overlay. You will get something like this.


Now, to add a little agility to the image, duplicate the base player layer and go to Filter > Blur > Motion blur. Enter these parameters.


Move the layer a little to the left.


Temporarily hide the visibility of the blurred layer by pressing the little eye next to it in the layers panel (F7). Now that we have the base image ready, lets see how to make those cool energy lights and beams in the next page.
1  |  2
                  

Energy Beams and Lines in Photoshop II

1  |  2 
Now, we will make energy beams at his hands. Choose the Pen Tool (P) and create a path near the hand. What we want to do is make a beam that is in line with the direction of movement of the hand.


Now, convert the path to a selection (Ctrl + Enter). Feather the selection (Alt + Ctrl + D) with a radius of 10 px. Create a new layer under the player layer and fill the selection with white using the Paint Bucket tool (G). 


With the selection still active, create a new layer above this white layer and fill it with blue.Set its blend mode to Overlay. Deselect by pressing (Ctrl + D). Now, duplicate (Ctr + J) both the white  and blue layers and set their blend modes to Overlay. You will get something like this. 


Make a similar path and selection for the other hand. 


Now that all our energy beams are in place, we can begin with the energy lines. We will make them at each of the hands and legs. Lets begin with the right hand. First, we make our basic path as shown with the Pen tool (P)


Next, create a new layer above the player layer. Go to the brush tool and choose a brush of radius 5  -7 px. Set you're foreground colour to white. Now select the pen tool and right click on the path. Choose 'Stroke Path' and select Simulate Pressure 


You will get something like this.


To remove the parts that are to be behind the arm, simply erase the unwanted portion using the eraser.


Next, right click this layer in the layers palette (F7) and choose 'Blending Options'. Select Outer Glow. Enter the following parameters. I've chosen a red tinge for the glow.


You will end up with something like this.


Duplicate the layer (Ctrl +J) and slightly offset it. Reduce its opacity to 60 %. The create a new layer. Choose a soft brush of radius 200 px and opacity 70% and paint over the arm.


Change the blend mode to Multiply.


Repeating the same process on th other limbs and the hoop, i got this. Nice isn't it?


Remember the motion blur layer we had hidden earlier? Well make it visible it now. And there you have it!


1  |  2

Feel free to comment or post any queries or images.
If you like this tutorial, you should check out some of our other ones.


Wednesday, April 20, 2011

Turning a Picture into a Colour Pencil Drawing

Photoshop offers a vast variety of wonderful tools. Having as many as possible in your repertoire always helps. Today we make use of the Minimum filter and a few Layer Blend Modes to effectuate an absolutely pulchritudinous result. Here is the final image - a symphony of light and colourful strokes.


So let's begin. Open up you're file in Photoshop. Here is a peek into the image I used.


Now, we will duplicate and desaturate the image layer. To do this, select the image layer from the layer window (F7) and press Ctrl + J. Then press Ctrl + Shift + U to desaturate. Your image will then look something like this.


Next, we need to invert the colours of the image. Before that, duplicate the desaturated layer by pressing Ctrl + J. Then press Ctrl + I. You will get a negative like this.

Here comes the important part. With the 'negative' layer selected, go to Filter > Other > Minimum. Enter the radius as 1 pixel.


Change the Layer Blend Mode of the layer to Color dodge or press Alt + Shift + D. You will get a soft image like this.


To darken the image, first merge all layers into a new layer by pressing Shift + Alt + Ctrl + E, then change the blend mode of the new layer to Multiply. If necessary, duplicate this layer as many times as you want to get the appropriate darkness level.


To colour the image, move the original image you started with to the top of the stack and change its blend mode to Color. Beautiful, isn't it?


I've followed the same steps on other images to get wonderful results. Try it out yourself.


Feel free to comment or post any queries or images.
If you like this tutorial, you should check out some of our other ones.

Wednesday, April 6, 2011

Turning a Picture into an old Conté Sketch

Here, i show you how to turn a picture or painting into a conté sketch. We have the original picture on the left and what you should end up with when you follow this tutorial on the right.


Ok. Lets get started. Open up a blank file in Photoshop. Go to Layer > New Fill Layer > Solid Colour. Rename the layer Grey (instead of Colour Fill 1). Now go to Filter > Noise > Add Noise  and enter an amount of  7% as shown. Set it to Gaussian and ensure it is Monochromatic.


You will get something like this.


Now, drag your image onto this file and resize it to fit using the free transform option ( Ctrl + T)


Right click this layer in the layer window ( F7), go to layer properties, and rename it 'Ship'. Press Ctrl +J to duplicate the ship layer. Similarly, rename the new layer 'Edges'. Go to Filter > Stylize > Glowing Edges. Enter the parameters shown.


You will get some thing like this


Next, press Ctrl + I to invert colours. We need only Black and white shades on our image. So press Ctrl + Shift + U to Desaturate the image. You should get something like this.This filter is used to highlight the outlines of the image.

Hide the edges layer by pressing the tiny eye next to it in the layer window (F7). Now click on the Ship layer. Go to Filter > Artistic > Rough Pastels. Enter the following values and click ok.


Press Ctrl + Shift + U to desaturate the layer. You're image should look like this.

Next, duplicate the ship layer twice by pressing Ctrl + J  twice. Rename one as 'Cutout' and one as 'Pencil'.  On the cutout layer, apply the following filter. Filter > Artistic > Cutout and enter the following parameters. 


You should get something like this.


Now, hide the Cutout layer like (by clicking the eye button next to it). Set your foreground and background colours to grey and white respectively as shown on the left.   Select the Pencil layer you created earlier. Go to Filter > Artistic > Coloured Pencil. Enter the paramaters shown below. Click OK.


After using the filter, the layer will look like this.


Now Rearrange you layers in this order, make all of them visible and watch, as the magic begins.


Change the blending mode of the Edges layer to Soft Light as shown.


Similarly, change the blending mode of the Cutout layer also to Soft Light, the mode of the Pencil Layer to Multiply and the mode of the Ship layer to Hard Light. You're image will be transformed to something like this.


Now, use the Eraser tool with a brush of your choice and rub off the darker regions in the Cutout and Pencil layers. Take your time and make sure you're happy with what you see. This was what i got.


To merge everything to a new layer, press Ctrl + Shift + Alt + E. Now, to give it an oldish effect, go to Image > Adjustments > Color Balance > ( or press Ctrl + B) and enter these values.


And voila!  You have you're conté sketch ready to use.


Feel free to comment or post any queries or images.
If you like this tutorial, you should check out some of our other ones.